Hexo+github搭建blog
, 02 Nov 2019
准备工作:安装node.js,git,hexo,加上github账户即可。 hexo官方文档 什么是Github Page >备注:以下前面为hexo在git for windows的配置安装,前三个标题推荐改为使用WSL>安装,linux子系统安装后可看这篇章的标题–在WSL中手动安装node,hexo,之后再按照第三个标题相关配置往下进行。
[toc]
node.js 安装
node下载链接,按需安装即可。
git下载链接,若是官网下载网速不行,可mail to me,传百度云链接。
安装完成后,可以在菜单栏看到Git GUI Here 和 *Git Bash Here*两个选项。打开gitbash输入命令行,有版本信息即可。
git --version
node -v
npm -v
安装hexo
在gitbash中,命令行使用与linux相似,可选择一个磁盘,新建一个目录,如(/d/github.io),cd 到该文件夹下使用npm命令。
npm install hexo-cli -g #安装hexo
npm install hexo-deployer-git --save  #表示安装 hexo 部署到 git page 的 deployer
初始化一个blog,可使用hexo init直接在当前目录初始化,亦可hexo init blog这样新建一个文件夹。
本地查看效果,cd 到初始化的文件夹下,执行以下命令,登录http://localhost:4000/
hexo g
hexo s
假如4000的端口被占用,可使用hexo g -p 4001,hexo s 后访问相应端口即可。
gitbash最后会显示如下信息说明操作成功。
INFO Hexo is running at http://0.0.0.0:4000/. Press Ctrl+C to stop.
将博客n部署到github page
到目前为止,我们的本地博客就成功搭建了,但是现在我们只能通过本地连接查看博客,我们要做的是让其他人也能够访问我们的博客,这就需要我们将博客部署到Github Pages上。
githubsign up 注册账户。
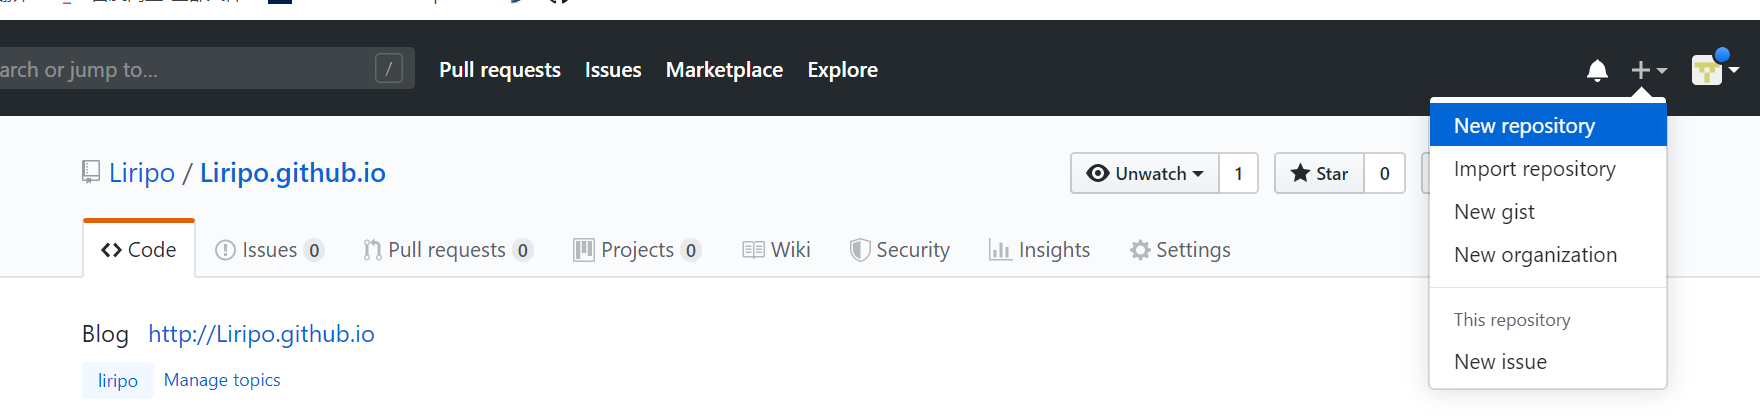
点击*New repository*开始创建,步骤及注意事项见下图点击 New repository 开始创建,如下图。
 之后创建一个仓库名如(Liripo.git.io),我的github账户名为Liripo。
配置ssh密钥
只有配置好 SSH 密钥后,我们才可以通过 git 操作实现本地代码库与 Github 代码库同步,新建文件夹(如mkdir ~/.ssh),cd ~/.ssh, Git Bash 输入以下命令:
ssh-keygen -t rsa -C "your email@example.com"
//引号里面填写github的注册邮箱,比如我的是liripo@qq.com
接着出现
Generating public/private rsa key pair.
Enter file in which to save the key (/c/Users/you/.ssh/id_rsa):
//到这里可以直接回车将密钥按默认文件进行存储
然后
 Enter passphrase (empty for no passphrase):
//这里是要你输入密码,其实不需要输什么密码,直接回车就行
Enter same passphrase again:
最终屏幕显示如下信息:
Your identification has been saved in /c/Users/you/.ssh/id_rsa.
Your public key has been saved in /c/Users/you/.ssh/id_rsa.pub.
The key fingerprint is:
这里是各种字母数字组成的字符串,结尾是你的邮箱
The key's randomart image is:
这里也是各种字母数字符号组成的字符串
运行命令$ clip < ~/.ssh/id_rsa.pub,将公钥的内容复制到系统粘贴板上;或者less查看并复制 ~/.ssh/id_rsa.pub
在GitHub上添加你的公钥
① 登陆 GitHub,进入 Settings; ② 点击 SSH and GPG Keys; ③ 选择 New SSH key; ④ 粘贴密钥;#备注:tittle随意填。 输入以下命令:注意:git@github.com不要做任何更改!
ssh -T git@github.com
之后显示的内容,输入yes即可。 出现successfully字样即是成功,不必管其他的。
配置git个人信息
Git 会根据用户的名字和邮箱来记录提交,GitHub 也是用这些信息来做权限的处理,输入以下命令进行个人信息的设置,把名称和邮箱替换成你自己的,名字可以不是 GitHub 的昵称,但为了方便记忆,建议与 GitHub 一致。
git config --global user.name "此处填你的用户名"
git config --global user.email  "此处填你的邮箱"
到此为止 SSH Key 配置成功,本机已成功连接到 Github。
将本地的 Hexo 文件更新到 Github 的库中
cd 到刚刚hexo 初始化的目录下,配置*_config.yml*这个文件
github可以使用vim 编辑其,输入vim _config.yml,使用shift +g 快捷键到行尾,找到deploy字样。
# Deployment
## Docs: https://hexo.io/docs/deployment.html
deploy:
  type: git
    repo: git@github.com:Liripo/Liripo.github.io
	  branch: master
repo处的Liripo修改成d你的用户n名即可。
将本地修改的blog部署到GitHub上
第一次部署,输入命令安装deployer
npm install hexo-deployer-git --save
之后使用
hexo d -g
即是部署到github上,可以到https://github.com/Liripo/Liripo.github.io(Liripo修改成你的账户)查看更新状态,亦可以到http://liripo.io上查看你的博客。 但是这样你的博客也没有那么快响应,可以将步骤拆分开来
hexo g #生成静态页面
hexo s #本地查看
hexo d #部署上去
新建文章可以使用如hexo n "hallo world"的命令快速在source/*_posts下生成一个halloworld.md的文件,你可以使用vim编辑这个文件,这个文件使用markdown语法书写。
当然,markdown语法也可以使用如Typora支持markdown的编辑器,之后将写的文件以.md保存在your/path/to/blog_source/_posts*里面即可。
还有一点值得注意,
hexo g&&hexo s&&hexo d
需要在你初始化的那个目录下使用。
博客备份
使用hexo-git-backup 插件备份
Hexo 版本是 3.x.x,则使用以下命令安装:npm install hexo-git-backup --save
这里不在github.io下新建分支,而是新建了一个储存库hexo
到 Hexo 博客根目录的 _config.yml 配置文件里添加以下配置:
backup:
  type: git
  theme: next
  message: Backup blog
  repository:
    github: git@github.com:Liripo/hexo.git,master
    coding: git@git.dev.tencent.com:Liripo/hexo.git,master
-theme:你要备份的主题名称
-message:自定义提交信息
-repository:仓库名,注意仓库地址后面要添加一个分支名,比如我就创建了一个 backup 分支
到此即可使用命令hexo backup或者hexo b备份博客了。
hexo及next主题优化
这里便不多作介绍了,参考网址
hexo文章加密
使用插件hexo-blog-encrypt即可,可在hexo插件中心或者github上的源代码获得。
安装可使用npm安装npm install --save hexo-blog-encrypt
在站点配置文件启用插件_config.yml,随意找个位置即可:
encrypt:
    enable: true
	abstract: 这是一篇加密文章,想查看的话请发我邮箱联系。
  	message: password
需要加密的文章加入”password”字段即可
---
title: Hello World
date: 2016-03-30 21:18:02
password: hello world
---
高级设置可以看github上的Readme。
picgo+github构建markdown图床
建立一个Github仓库后在setting里生成一个token,如我的为a9717fe783682d0ddb3354f23ecc4aacbc2d9cf0
下载picgo
配置,如图所示即可,注意/Liripo/blogphoto记得更换:

不过图片显示不稳定,本人换成了腾讯云cos。
我的博客环境
hexo --version
hexo: 4.0.0
hexo-cli: 3.1.0
os: Windows_NT 10.0.17763 win32 x64
node: 12.13.0
v8: 7.7.299.13-node.12
uv: 1.32.0
zlib: 1.2.11
brotli: 1.0.7
ares: 1.15.0
modules: 72
nghttp2: 1.39.2
napi: 5
llhttp: 1.1.4
http_parser: 2.8.0
openssl: 1.1.1d
cldr: 35.1
icu: 64.2
tz: 2019a
unicode: 12.1
查看依赖包,cat hexo 目录下的 package.json 文件cat package.json
{
  "name": "hexo-site",
  "version": "0.0.0",
  "private": true,
  "scripts": {
    "build": "hexo generate",
    "clean": "hexo clean",
    "deploy": "hexo deploy",
    "server": "hexo server"
  },
  "hexo": {
    "version": "4.0.0"
  },
  "dependencies": {
    "hexo": "^4.0.0",
    "hexo-asset-image": "git+https://github.com/CodeFalling/hexo-asset-image.git",
    "hexo-blog-encrypt": "^3.0.6",
    "hexo-deployer-git": "^2.0.0",
    "hexo-generator-archive": "^1.0.0",
    "hexo-generator-category": "^1.0.0",
    "hexo-generator-index": "^1.0.0",
    "hexo-generator-searchdb": "^1.1.0",
    "hexo-generator-tag": "^1.0.0",
    "hexo-git-backup": "^0.1.3",
    "hexo-renderer-ejs": "^1.0.0",
    "hexo-renderer-marked": "^2.0.0",
    "hexo-renderer-stylus": "^1.1.0",
    "hexo-server": "^1.0.0",
    "hexo-toc": "^1.1.0",
    "hexo-wordcount": "^6.0.1"
  }
}
更新
npm更新包
- npm 更新全局安装的包:
npm update -g-npm 更新站点文件夹根目录下安装的依赖包:cd ~/blognpm update - 更新 npm :
npm install npm -g 更新 Node.js 到最新版:
npm install n -g
n latest
更新主题
改动不大没必要更新,更新有风险,需谨慎
cd ~/blog/themes/next/直接
git pull一般会失败,这是因为改过了本地配置#先将本地的所有修改先暂时存储起来 git stash #拉取最新数据,之所以可以拉取是因为有.git文件 git pull #接下来还原暂时存储的内容 git stash pop上面失败的话是因为Git 无法确定一些改动,这时可以选择手动修改,很麻烦但是推荐使用 或者直接放弃本地修改并更新
git reset --hard
git pull
使用 gulp 压缩 hexo 静态资源
官方文档 查看网页源代码发现有大量留白。利用 gulp压缩。首先任意目录全局安装:
npm install gulp-cli -g
然后到站点文件夹根目录,cd ~/blog【省去配置环境变量的麻烦】:
npm install gulp-clean-css gulp-uglify gulp-htmlmin gulp-imagemin gulp-htmlclean gulp --save
在博客根目录下创建一个名为 gulpfile.js 的文件
// 文件位置:~/blog/gulpfile.js

var gulp = require('gulp');
var minifycss = require('gulp-minify-css');
var htmlmin = require('gulp-htmlmin');
var htmlclean = require('gulp-htmlclean');
gulp.task('minify-css', function() {
    return gulp.src('./public/**/*.css')
        .pipe(minifycss())
        .pipe(gulp.dest('./public'))
});
gulp.task('minify-html', function() {
  return gulp.src('./public/**/*.html')
    .pipe(htmlclean())
    .pipe(htmlmin({
         removeComments: true,
         minifyJS: true,
         minifyCSS: true,
         minifyURLs: true
    }))
    .pipe(gulp.dest('./public'))
});
gulp.task('default', ['minify-html', 'minify-css']);
部署到Github Page
hexo clean && hexo g && gulp && hexo d
最后,图方便直接git clone 别人的博客备份,再稍微修改,删掉别人的文章就好喽!【不过你要知道别人的依赖环境才行】
脚注添加
npm install hexo-reference --save
在站点配置文件添加
plugins:
  hexo-reference
文章加密
npm install hexo-blog-encrypt
在站点配置文件添加
 encrypt:
   enable: true
#   abstract: 此文已加密,如若需要观看,请邮件联系。
#   message: password
移除某插件
npm un <插件> --save
修改链接样式
cd themes/next/source/css/_common/components/post && vim post.styl
/*修改文章内链接文本样式*/
 .post-body p a{
   color: #0593d3;
   border-bottom: none;

   &:hover {
     color: #0477ab;
     text-decoration: underline;
   }
 }
添加 README.md 文件
每个项目下一般都有一个 README.md 文件,但是使用 hexo 部署到仓库后,项目下是没有 README.md 文件的。在 Hexo 目录下的 source 根目录下添加一个 README.md 文件,修改站点配置文件\ _config.yml,将 skip_render 参数的值设置为
skip\_render: README.md
添加Daovoice在线聊天
注册地址http://www.daovoice.io/
使用我的邀请码进行注册:05043655
复制粘贴代码
修改的hexo的文件路劲如下: 博客/themes/next/layout/_partials/head/head.swig末尾添加下面的代码:
{% if theme.daovoice %}
 <script>(function(i,s,o,g,r,a,m){i["DaoVoiceObject"]=r;i[r]=i[r]||function(){(i[r].q=i[r].q||[]).push(arguments)},i[r].l=1*new Date();a=s.createElement(o),m=s.getElementsByTagName(o)[0];a.async=1;a.src=g;a.charset="utf-8";m.parentNode.insertBefore(a,m)})(window,document,"script",('https:' == document.location.protocol ? 'https:' : 'http:') + "//widget.daovoice.io/widget/b6dbddb6.js","daovoice")
 daovoice('init', {
  app_id: "用户ID"
});
daovoice('update');
 </script>
{% endif %}
其中用户ID可以在Daovoice注册好页面的应用设置中找到。app_id关键字之后
在Next主题的配置文件博客/themes/next/_config.yml末尾中添加用户ID:
daovoice: true
daovoice_app_id: 用户ID
不大好用,加载页面不顺利
添加hexo-neat压缩html,js,css
首先npm install hexo-neat --save
在站点配置文件中添加
# hexo-neat
# 博文压缩
neat_enable: true
# 压缩html
neat_html:
  enable: true
  exclude:
# 压缩css
neat_css:
  enable: true
  exclude:
    - '**/*.min.css'
# 压缩js
neat_js:
  enable: true
  mangle: true
  output:
  compress:
  exclude:
    - '**/*.js'
npm管理
#查看下载的包的路径,即npm install的包
npm config get prefix
在WSL中手动安装node,hexo
在node网址寻找最新版本linux的二进制版本,以.xz结尾,如我使用以下命令安装了我的版本
wget https://nodejs.org/dist/latest/node-v13.12.0-linux-x64.tar.xz
解压即可tar xvf node-v13.12.0-linux-x64.tar.xz
配置相关环境变量到~/.bashrc,运行node -v npm -v看看是否有版本信息,之后npm install hexo-cli g安装hexo,安装路径应在node安装目录同个目录下的node_model目录下,找到hexo-cli目录,进入可以看到bin下有hexo运行程序,加入到环境变量即可,或者软连接到/usr/local/bin之类的。